
Gardening Article
By: Susan Perry
Colorado State University Extension Master Gardener in Larimer County
Cold Frames Part 1: What They Are and Why Use Them
Have you ever grown so many carrots, lettuce, spinach, onions or beets that you can’t eat them all by the time cold weather arrives? Don’t want to freeze, can or pickle? Or maybe you haven’t had enough of your fresh, home-grown produce …. Well, a cold frame might be an answer to consider. A cold frame is a low-tech alternative to a greenhouse, with a lower profile (in case your HOA is watching) and smaller footprint. While not without some effort, making and using a cold frame can harness the benefits of solar energy to keep mature (or almost mature) vegetables in a dormant state until you decide to harvest them. Baby plants will not grow – or not grow very much – but mature plants will go into their own type of hibernation until you’re ready to use them.
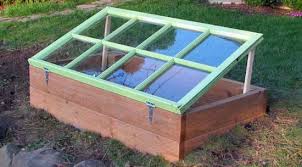
Simply, a cold frame is a wooden frame you set on the ground around your cold-hardy vegetables. Think of it as a small, 12” high greenhouse with wooden sides, no bottom, and a cover that allows sunlight to penetrate. During the day, the sun warms the air and ground inside, even on cloudy days. In fact, often on sunny winter days, it’s necessary to vent (or open) the cover so the inside doesn’t become too hot. The first year I tried this, a 50 degree sunny January day successfully fried my lettuce by 11am. The temperature in the tiny hoop house registered 90 degrees!
In the afternoon, shortly before the sun goes down, put the glass back on so that the inside of the box stays warm during the night from heat retained by the ground. The cold frame creates a micro-climate in which the plants can survive cold nights or extreme cold spells.
To take advantage of daily solar gain, make the north end of the cold frame taller than the south end. The east and west sides will slope from north to south. If you’re not the handy type or don’t know someone handy with a saw, then skip the sloping – a wooden box with glass or clear plastic on top will work just fine. While not ideal, in future years you can make enhancements. The important thing is that the box doesn’t let air in unless you vent it, so things need to fit together well. The cover can be an old glass storm window, well anchored plastic sheeting, or other more rigid clear plastic. The first year I tried this I made an 18” high hoop from chicken wire, covered it with clear plastic, and clothes-pinned the plastic to the chicken wire. During really cold spells, I threw a blanket on top. All was well till that fateful, sunny January day mentioned above.
There are many resources on the Internet that describe how to make a simple cold frame. Factsheet 7.409 from CSU Extension (www.ext.colostate.edu) briefly describes how to construct a cold frame to start plants from seed. (Another benefit of cold frames is they are a great way to get an early start on your plants in the spring.) Other resources are available at our local libraries. Often these resources recommend orienting the cold frame in one direction or another (north-south, east-west). In my opinion, you need to make it work for your garden, regardless of what the experts say. In our case, our beds are long from north to south and narrow from east to west and so my cold frames are oriented to work within this constraint — much easier than trying to re-orient the entire garden. However, I refer you to these resources because they can describe the construction details for cold frames in far more detail than can be addressed here.
Last year, as an experiment, we used a cold frame to prevent the ground from freezing around the several hundred carrots we had in October. We quickly cobbled together one cold frame using stacking, hinged wood boxes from a local recycler in Timnath, lined them with Styrofoam, and covered them with two old aluminum storm windows. We enjoyed carrots much of the winter and harvested the last ones in mid-January 2014. This was a vast improvement over the prior winter, where we had no cold frame and beginning in mid-December had to literally use a chisel to get the carrots out of the frozen ground! Surprisingly, they tasted fine – until we had a thaw and re-freeze. Then they were mush.
This winter (our fourth), we’re expanding our cold frame efforts. We will have six cold frames – built from “culled” wood and covered with rigid plastic. We hope to harvest spinach, lettuce, carrots, beets, and leeks throughout the winter. Sure, we’ll have to remember to vent them most mornings and cover them most evenings but we’ll also have fresh, home-grown veggies all winter.
For more on cold frames and veggies that they can be used with, tune in next week for Cold Frames Part Two.
The author has received training through Colorado State University Extension’s Master Gardener program and is a Master Gardener volunteer for Larimer County.
Larimer County Master Gardeners is a county-based outreach of Colorado State University Extension providing information you can trust to deal with current issues in agriculture, horticulture, nutrition and food safety, 4-H, small acreage, money management and parenting. For more information about CSU Extension in Larimer County, call (970) 498-6000 or visit www.larimer.org/ext
Looking for additional gardening information? Check out the CSU Extension Horticulture Agent blog at www.csuhort.blogspot.com for timely updates about gardening around the state.